How To Prepare For Your First Clinic

George morris clinic

George Morris Clinic

It’s time to start thinking about show season again.  To get you and your horse in shape for the discipline you choose, consider going to ride in a clinic this year.  Clinics are great chances to learn under skilled trainers and riders, but riding in your first clinic can be a bit intimidating.  Planning ahead of time can ensure that you and your horse are ready to go on the day of the clinic.

Research the Clinician

Clinicians are all individuals, and because of this each clinician’s clinics are run a little bit differently. Find out about the clinician’s prior clinics. What were they like? How were riders and horses turned out? Does the clinician have a standard form in which clinics are run – for instance, focusing on groundwork in the morning and riding in the afternoon?

Learning about the clinician’s teaching methods can help you to prepare yourself, too. If the clinician has books or videos available, use them to give yourself a foundation on which you can build during the clinic. Understanding the clinician’s methods of teaching can also help prepare you for what you can expect on the day of the clinic.

Finally, have a clear idea of what you want to work on.  If flying changes are an issue, but only on the right, let the clinician know so she can focus on it.  Don’t  make the clinician “guess” what you need to improve.

Find Out About the Dress Code

The turnout expected of horses and riders varies widely from clinic to clinic. Find out about the desired dress code for your clinic, and then make sure that you and your horse are ready to fit that dress code. Regardless of the specifics of any clinic, you should always make sure that both you and your horse are polished. Put effort into your appearance, and be sure to clean your tack and use clean saddle pads and leg wraps.

Keep Yourselves Fit

Clinics can demand a lot of a horse – and a lot of you. It isn’t fair to expect your horse to participate in a multi-hour clinic if you only ride him a few hours a week. Spend time building up your horse’s condition, and yours as well, especially if you know that the clinic will be athletically intense.

As you work with your horse, touch on the basics that you will be working on in the clinic, but don’t drill him on the particular issues. Remember, a clinic is meant to help a horse and rider improve. You and your horse can be less than perfect on clinic day; the idea is that when you leave, you’ll leave with new knowledge and improvement.

Do your homework when choosing and preparing for a clinic, but once the day arrives, relax and have a great time learning with your horse.  And listen to what the clinician says – they have alot of experience and you paid them to teach you.


Photo credit:  Practical Horseman magazine

The Hackney Pony

Hackney ponyIf you are looking for a new horse, especially if you’d like to have the unique, consider the  Hackney Pony. This flashy, high-stepping pony has an intriguing history and makes a popular horse show competitor.

History

The Hackney originated from Norfolk, England. Norfolk Trotters, a popular breed of horse, were used in the region and were bred to emphasize both speed and style. Breeders wished to improve the breed, though, so they bred Norfolk mares with Thoroughbred stallions to add speed and a refined appearance to the Norfolk Trotter. Beginning in the late 1700s, the offspring of the Norfolk and Thoroughbred were further specialized, refined, and bred, creating the Hackney horse.

During the 19th century, large quantities of horses were being exported by ship. Since larger horses were more difficult to transport, smaller horses were in higher demand. Additionally, the continued development of roadways created demand for a horse that could trot quickly to provide faster transportation than that offered by larger draft horses. Thanks to the changing times, the Hackney’s breeding was once again refined to create the Hackney Pony, mainly by breeding Hackney horses to Fell Ponies.

Hackneys were imported to America beginning in 1878, and the Hackney Stud Book Society was created in 1883. Hackney Ponies served primarily as carriage horses, becoming popular as show ponies after World War II.

Breed Characteristics

Hackney Ponies typically stand between 12 and 14 hands high, and may not exceed 14.2 hands high. They have pony characteristics, meaning that they have a small head with large eyes. Hackney Ponies have muscular, arched necks, a light build, and fine bone. They carry their tails high and have exaggerated leg action, raising their knees high. Hackney Ponies are typically bay or black, though chestnut colors do occur.

Hackney Ponies are shown in a variety of divisions which depend on the physical characteristics of each pony. Roadster Ponies stand at 13 hands or less and are known for their speed. They are shown at three trotting speeds and pull a road bike. Cob Tail Ponies stand at 14.2 hands or less and are shown with a shortened tail and braided mane. Harness Ponies measure 12.2 hands or less and are shown with long manes and natural tails. Pleasure Ponies stand at 14.2 hands or less and are shown at three different gaits. Hand Ponies are young ponies that are shown in-hand.

The Breed Today

The Hackney Pony continues to make a popular show pony today. Hackney Ponies are most commonly driven, but can also be shown in-hand and under saddle.

The Hackney Horse

A variation of the Hackney Pony, a Hackney that stands over 14.2 hands is classified as Hackney Horses.  Shown in a variety of ways, the Hackney Horse is a versatile performer.

More Hackneys are competing in Dressage and Jumping Divisions in both the USA and the UK.  Several shows offer Hackney Horse classes. 

For more information on the Hackney Pony or Hackney Horse, visit the American Hackney Horse Society website.

Our Love/Hate Relationship With Spring

foal in flowers SunshineRidingSchool
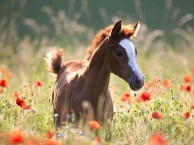
Spring is finally here (or at least almost here…)! For riders, spring means many things – some of them good, some of them not so great. Here are some of the things that we love – and hate – about spring!

Daylight Savings Time

Sometimes Daylight Savings Time is the earliest sign that spring is right around the corner. Who doesn’t love that extra hour of daylight, which means that we might be able to see when we ride our horses after work? While it might mean feeding horses in the dark in the morning, Daylight Savings Time can’t help but hint of usable outdoor riding rings, late afternoon lessons, and even horse shows.

Foals

Let’s face it – there’s nothing cuter than new foals playing in the pasture.  Just watching them makes you smile.  And if one of them is yours, well, you already know how lucky you are.

Shedding Season

Nothing says spring more than your hairy horse suddenly becoming not so hairy. Every rider can commiserate about shedding season – the rug that is left beneath your horse after a grooming, how you can endlessly run a shedding comb over your horse with no end to the hair in sight, and the hair that follows you home from the barn in the car no matter how hard you try to leave it at the barn.

When it comes to shedding your horse out, we advise that you use a light jacket or pullover to keep as much hair off of you as possible, and keep a lint roller nearby for good measure. Leave the hair outside for birds to use in their nests. And oh – NEVER put on lip gloss before a trip to the barn in the spring.

Allergies

If you have allergies to anything, this is when you’ll feel it the most.  Grass, dust, mold, flowers – there are many things that can set off a bout of sneezing or watery eyes.  Talk to your doctor about antihistamines that can help alleviate some of the symptoms.

Spring Shots

Typically spring is when most of the necessary shots for your horse are due – tetanus, rabies E/W Equine Encephalitis, flu/rhino, etc.  Which ones you give can depend on where you and your horse live, how  much traveling you do and other factors.  Check with your veterinarian on what he/she recommends for your horse.  Whether you chose a few or a whole flight of vaccinations, they can be expensive.  Be sure to budget for these to keep your horse healthy all year round.

“Up” Horses

Does your horse feel like he’s on springs when you first get on him again after the winter? Maybe you’re lucky enough to have an indoor riding arena, but haven’t quite kept up in your riding routine this winter. Regardless of the reason, know that many other riders are also riding out the “spring sillies” and are hoping that their horses settle back into their work routines – soon!

Muddy Everything

Ahh, mud. Your horse loves it, but you don’t feel the same. Thanks to the mud, your grey comes in from the pasture looking like a chestnut on a regular basis. Shoes are sucked off to the depths where they will never be found again, and hoof abscesses and soft hoof soles abound. Fighting the mud is often a losing battle unless you take serious measures such as installing a Stable-Ity Grid. Hopefully the spring showers stop and let the mud dry up.

The First of the Flies

Do we even say it? Spring, unfortunately brings with it the first of the flies. Sure, they’re just the little ones that get into your eyes and ears, and aren’t yet the full-blown blood suckers that we know are coming, but still. Late spring will have us thinking of fly prevention before you know it, so enjoy the minimal fly presence while it lasts.

Spring! We love the fact that it’s finally here, but we don’t love all of the fun that it brings. Just remember, only nine months til winter……

photo credit:  Sunshine Riding

Get Your Horse Ready for Show Season With New Jumps

jump spiderOne of the best ways to succeed jumping at a show is to get your horse as familiar as possible with a variety of jumps in the safety of your own arena.  Most jumps at shows are fairly straightforward – vertical and oxer.  What so often scares horses are the bright colors, flags, flowers and other design elements.

And after a few years, your horse jumps looking a little tired and weathered? Jumps take quite a beating, and without regular care, their appearance can quickly deteriorate. If you’d like to put a little life back into your jumps or make them more of a challenge, we’ve come up with some great ways that you can refresh your jumps.

Sand and Paint

One of the simplest ways that you can revitalize your jumps is by sanding and repainting them. Pick a day when the weather is nice, gather up some friends, and have a jump painting party. Before you paint the jumps, take coarse sandpaper and sand off any existing loose paint and rough edges. Then, get to work with a paintbrush. When you’re painting, don’t forget to pay attention to your jump cups. Metal cups often rust and start to look worn within a few years. If this is the case, take some sandpaper to the jump cups and then follow up with a spray paint intended for metal use. To prolong the life of the cups, use a rust-inhibiting paint for a new finish and added protection. If painting really isn’t your thing, you can have your jump poles looking new again by adding store-bought pole covers. These covers slip easily over your jump poles, but work best with PVC poles.

Pick Up Paint for Cheap

Worried about your budget? Head to the “oops” section of your local hardware store or home improvement center. This is the section where paint colors were mixed and came out in the wrong shade. You can find some great paint colors in the “oops” section for an excellent discount. If you have particular colors in mind then you may be out of luck, but if you’re open-minded then you might find some color combinations that you wouldn’t have otherwise thought of.

Add Flowers

Flowers can spruce up any jump. Whether working them into the base of the jump standards or creating an actual flowerbox jump, they instantly add life to your fences. Pick up fake flowers for cheap at your local dollar store, and keep an eye out for sales on flowers at craft stores. You’ll get the best bargains when you buy the fake flowers as they go out of season and the stores are making room for the next floral trend.

Add Other Natural Elements

Using logs or branches with a jump can make them more interesting for your horse.  And if you are considering doing a hunter pace, it’s good to get familiar with these natural elements.

Use a Tarp

No Liverpool? No problem. A blue tarp works just as well, and you can get a tarp for a fraction of the cost of an actual Liverpool jump. For an added challenge, try draping the tarp over jump poles to make scary fences. 

There are plenty of things you can probably find around the barn to make new and interesting jumps – railroad ties, barrels, tires, safety cones, etc. Don’t use any materials that are flimsy or that could break easily.  Make sure all jumps are safe and secure before using.

The Origin of “Horse Whisperers” and other Irish Horse Legends

shamrock in horse shoeWith the Irish celebration of St. Patrick’s Day  just a few days from now, here is one of the many Celtic legends that include the horse.  Thank to “Symbolic Horse Education Resources” for the information.

Origins of horse whispering can be seen in Celtic belief and in the more recent “horseman’s word”, a magic word which if uttered gave one power over horses, and with claim going back to Britain.  This concept reached its culmination at the latter end of the 19th century with the formation of the “Secret Society of the Horseman’s Word”, prevalent down the north-eastern side of Britain.  The word was such a closely guarded secret that if it existed it was never divulged, and the society’s rituals also remain vague (only passed on through esoteric oral tradition), though it is still rumored to exist. 

Modern horse owners still tend to the belief that there may be a magical word that will give power over horses, and observe that some people do indeed appear to have better control over horses than others without apparently doing anything different.

Other Celtic horse legends include:

rhiannon celtic horse goddess

  • The horse was introduced into Ireland by the greatest of their native gods, Lugh, the sun god. 
  • Mannanan Mac Lir, the god of the sea, had a magical horse that could travel over land or sea.
  • Cuchulainn had two magnificent chariot horses which came to him from lakes.
  • Many riders emerged from the Otherworld astride a magnificent white horse.
  • Horses had the ability to see ghosts and refused to pass a haunted spot.
  • The “fíorláir” or ‘true mare’ – the seventh consecutive filly foal born to a dam, which was safe from all evil and its rider safe from all harm.
  • Celtic priests considered horses to understand the will of the gods more clearly than man and so could reveal divine secrets.  

10 More Things To Consider In Your Barn Design

CEE barn3Whether you are building a new barn or renovating an old one, the best way to get the barn you want is to remember the old adage, “form follows function.”  There are so many options for both the outside and the inside of your dream barn that you’ll have little trouble putting together the barn that’s right for you and your horses.  But before you start planning your barn, think about the following things:

  1. How will you use your barn?  Are you a boarding stable or breeding facility?  The size of your barn might need to be bigger than you thought to accommodate tack rooms, wash racks and/or foaling stalls.
  2. How many horses will you ultimately care for? You may just have a few horses now, but if you’re dream is to someday have a training facility, you should build a big enough barn to accommodate more horses. It’s always less expensive to build right the first time rather than trying to add on later. 
  3. Consider the weather. Are you planning to have attached paddocks?  Cold or wet weather may prompt you to be able to close doors leading to the paddock to keep horses warm and dry.  Also consider doors at the end of the barn to keep out inclement weather.  With either or both have an overhang or awning over them to keep everyone dry?
  4. Let there be light – and fresh air. Look at barn designs that will maximize the amount of fresh air and ventilation – both important to your horse’s health – to flow through the barn.   Look for designs that allow large amounts of natural light into your barn. 
  5. Consider your daily workflow. Will you use wheelbarrows to clean stalls or feed or will you need a barn with an aisle wide enough to drive a truck down the center aisle for these chores?  Will your hay be stored off site or do you want it close by in your barn’s hay loft?  Will you need additional room for a viewing area for parents or a kitchen or clubhouse area for boarder parties and relaxing? 
  6. Look at your proposed site location. Is it level?  Is the landscape such that water flows away from the barn?  From which direction will the wind come?  Sun?  Is there room for a driveway and parking area for boarders, the farrier and vet?  Will you offer trailer parking – will it be part of the barn structure so it can be covered?
  7. Consider utilities. How far is it to the nearest electrical and water sources? 
  8. Consider barn style. Do you have a preferred barn style that works best for your type of facility?  A Shed Row barn a good choice for warm climates as they maximize air flow and ventilation.  They can be configured in a straight line, an “L” shape or a “U” shape. The Full Monitor has a high center raised roof that lets hot air rise above the stalls and horses. The design also allows skylights and windows to be installed on each side of the center roofline, letting in more light and additional fresh air. The Monitor is good if you need to build a long row of stalls.  The Gambrel offers a large loft located above the stalls for added storage and increased headroom. Gambrel trusses eliminate the need for interior post and beam supports giving you more freedom in your floor plan.
  9. Look at legal considerations. What do the laws in your area allow you to build?  Are there restrictions on size or location?  In some areas, the barn must be a certain number of feet from your property line.
  10. Consider available construction materials. Do you want wood post and beam for the old-fashioned look of a barn?   Or do you want the low maintenance and fire-resistance of a steel modular building?

Take some time to day dream and visualize about your perfect barn.  Visit other barns to get additional ideas.  Now make a list of what you absolutely have to have.  Examples might be a wood barn with 12 stalls and paddocks with an overhang with each stall. 

Now think about what you’d like to have.  It might be enough room for a full kitchen and TV room for boarders.  Make sure you write everything down so you won’t forget anything when talking with your barn builder.

A final consideration when designing the outside of your barn is to make sure it’s horse friendly as well as people friendly.  Horses dislike dark, closed in places so design your barn with lots of room and plenty of natural light and air.

Be sure to visit the Classic Equine Equipment website for more ideas.

Photo credit:  Classic Equine Equipment


Barn Styles

Cee barnOne of your toughest decisions – but many people feel the most fun – you’ll make when building your barn is the style. There are many to choose from and each style can have modifications. Things to consider are the style’s suitability to your climate, the function or “flow” of your horse CEE barn2work and, of course, your budget. The amount of time you can wait for a new barn is also a factor. A modular barn can be erected in a few days, while a pole barn building can take months.

A Pole Barn (Post Frame) framing utilizes posts and beams to minimize the number of framing elements in walls. It is economical, strong and relatively simple to build, making it the most popular framing method for custom barns. A pole barn frame consists of 6- to 8-inch round or rectangular pressure-treated wood posts set 3 to 6 feet below the ground. Poles are typically set at 8- to 12-foot intervals and rest on a pad of concrete at the bottom of each hole. Poles and trusses or rafters are generally visible inside the barn. Pole barns are easy to build in part because they require no trench work for a foundation, only holes; and these can be dug using a tractor auger or a hand posthole digger.

A Timber Frame (Post and Beam) is another type of post and beam construction, but rather than plugging into the ground like a pole barn, a timber frame barn sets on a concrete foundation. A properly constructed timber frame is incredibly sturdy–some have lasted for hundreds of years. It is typically composed of 8- and 10-inch square timbers for main members and smaller timbers for roof purlins and floor joists. Major joints are traditionally dovetails and mortise and tenon, often hand cut and secured with wooden pins, like fine furniture construction on a larger scale. Craftsmen using traditional timber frame methods don’t use nails or other metal fasteners unless they are required by local codes. Timber frame barns are sometimes built-in or near the builder’s shop and shipped to the site to be erected by the builder, a local contractor or the owner. Timber-frame kits that use metal connectors to secure joints are available

Modular barns generally consist of a steel framework with steel-framed panels fitted in between. The panels are typically composed of a plywood or OSB (oriented strand board) core with sheet steel laminated to the inside surface and steel, wood or other siding material laminated to the outside surface. An advantage of this framing is that damaged panels can be replaced relatively easily. Some modular barns have a “warehouse” appearance, but many manufacturers offer a variety of styles, siding and roofing materials. If you don’t see a plan you like, most manufacturers will modify an existing plan to suit your needs. Modular barns generally go up quicker and with less expense than custom barns. They are especially fire resistant because of the steel framing and steel-skinned wall panels.

A Shed Row barn is the most common type of modular (or prefabricated) barn.  It is a good choice for warm climates as they maximize air flow and ventilation.  They can vary in the size of the overhand and can be configured in a straight line, an “L” shape or a “U” shape, depending on the number of horses and your work flow.  A shed row is also an option for colder climates, but consider enclosing the overhand area and adding insulation to the walls and roofing. Shed row barns have a shed or pitched flat roof. The shed roof is all one plane and is often used for three-sided shelters or small stables. It is also commonly attached to the eaves of an existing gable roof or to the wall of a barn.

One pole barn (or post-frame) style is called the Full Monitor.  It has a high center raised roof that lets hot air rise above the stalls and horses.  The design also allows skylights and windows to be installed on each side of the center roofline, letting in more light and additional fresh air. The monitor has essentially two shed roofs with a gable in the middle. This is good for long rows of stalls.

Another popular pole barn style is called the Gambrel.  It offers the benefit of a large loft located above the stalls for added storage. The Gambrel has a double-pitched roof popular on two-story barns having a second floor because of the increased headroom and useable floor space it allows. Gambrel trusses eliminate the need for interior post and beam supports, which allows you to create any floor plan you wish.

With the right choice of barn for your size and type of equestrian activities, as well as the weather in your area will give you (and your horses) years of happy living.  Visit the Classic Equine Equipment website for more barn ideas.

Photo credit:  Classic Equine Equipment

Boots and Bandages and Wraps – oh my!

boots and bandages weatherbeeta
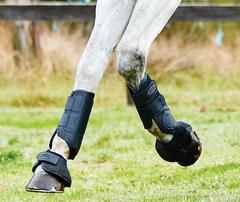
You’ve probably noticed that some horses wear boots or bandages on their lower legs when ridden.  Although they can provide some minimal support to the horse’s tendons and ligaments, boots and bandages are primarily used for protection of the horse from himself.  If you want to use something on your horse’s legs, it can be confusing to figure out what to use and when.

Sometimes a horse needs to be protected from himself. Because of his conformation, his hind legs may brush against each other or he may even kick himself when he is cantering.  Or a horse with a long stride can accidentally step on the back of his front feet at the trot.  While a horse’s hoofs can cause damage, those shod with metal horse shoes can cause a severe gash or bruise.  And a horse does strenuous work that involves jumping or sudden stops and starts, boots or bandages may help protect the delicate tendons in his legs from stress or injury.

But, not all horses require wearing boots.  Many new riders put on wraps or boots because everyone else seems to be doing it.  If you don’t ride your horse in high-risk movements or if your horse doesn’t seem to have an issue with scrapes or cuts, you can leave off the protective wrapping.  If you don’t know if you should put protective gear on your horse’s legs, ask a knowledgeable instructor what she thinks. Explain the sort of work you do with your horse and let her take a look at his conformation. An experienced instructor will be able to tell if your horse needs boots or bandages.  And, more importantly, she will show you the proper way to put them on.  Improperly applied boots and bandages can actually do more damage than good.

Some of the more common wraps for legs are:

Splint Boots (Brushing Boots)

Splint boots have a thick and/or hard plate that covers the inside of a horse’s lower leg. The plate protects a horse when he hits the inside of one leg with the opposite hoof. When a horse hits himself with the other hoof, it can cause nasty cuts on the inside of the leg. These cuts may take a long time to heal. Splint boots are probably the most widely used boots by horse people.

When putting a splint boot on, fit it slightly higher around the leg, then slide it down so the leg hair doesn’t get ruffled up and cause rubs. Many people fasten the bottom strap first so the boot doesn’t slip while you are securing it.

Bell Boots (Over-Reach Boots)

Bell boots sit on the bottom of the horse’s foreleg, around the coronary band at the top of the hoof. They are designed to fit the contours of the pastern and heel area. Bell boots are used on the front hooves and they help protect the front heels from getting nicked by the back hooves. Bell boots are made of rubber or stretchy material. Some have to be pulled on over the hoof and others have Velcro fastenings. They should not be so long that your horse trips over them or they interfere with his movement.  Correct sizing is important.

Exercise Bandages or Polo Wraps

Exercise bandages are stretchy wraps that give support to the tendons in a horse’s lower legs. They tend to be used when a horse is in strenuous work, or if he has suffered from tendon problems in the past. They are wrapped around the lower leg, and are usually secured with a Velcro strap.

Putting on a bandage properly is a skill that takes time to learn. If the bandage is not stretched out properly with the right tension or if it is wrapped incorrectly, it could hurt your horse’s leg instead of supporting it. Ask an instructor to show you how to wrap a leg and then practice, practice, practice until you get it right.

Sports Medicine Boots

Sports Medicine boots were developed specifically to address the prevention of suspensory injuries while at the same time protecting the soft tissue from cuts, abrasions and contusions caused by impacts to the legs by hooves and various other hazards.  They can be used on all four legs and consist of a neoprene-type material to provide cushioning and are secured with a Velcro strap that helps provide support.

Remember to use the right support at the right time to keep your horse happy and healthy.

Photo credit:  Weatherbeeta

Creating/Improving Your Wash Bay

wash bayHaving a safe and functional wash bay is an essential element of any barn  It can be outside or inside, though of course most would prefer inside.  Here are some ideas to consider when building or upgrading your wash area.

Wash bays are typically the same size as a stall.  They can be used for many other tasks as well – grooming, tacking up, shoeing and vet visits.  One of the main things you’ll need for your wash bay is access to water.  While cold water is often sufficient, installing a tankless water heater for instant hot water will make your barn a big favorite with anyone who boards there.  There is nothing that says that a wash bay must be inside the barn.  In fact, in places with mild winters, most bathing is done in outside wash racks.  But whether you are indoors or outdoors, there are still some things you must consider.  If you are the handy do-it-yourself-er, much of the construction and plumbing can be done by you.  But it’s best to have a building contractor look at your plans first – once you get started, it’s much more difficult to correct any mistakes.

When creating the overall design for your barn, think ahead of time where you want to put your wash areas.  Since a quick rinse is often done on hot summer days after riding, the bay might be positioned near the tack room.  Or to help it dry out more quickly, you may want to put the bay at either ends of the stable.  One place NOT to put a wash bay is somewhere that is either too high traffic or too isolated.  When bathing your horse, you are basically tying him into a 12 x 12 dark, wet area and that can be intimidating for some areas.  Good lighting, which we’ll discuss later, is very important.

Once you’ve identified the space, now it’s time to make it as water-resistant as possible.  Using metal or water resistant wood or wood-like paneling will help keep the area dry between baths.  Other options are concrete blocks painted with a waterproof sealant or some sort of fiberglass panel.

A non-slip floor with a drain is an absolute necessity.  If you are making a wash rack outdoors, this can easily be done by putting several layers of crushed gravel down and allow the water to simply seep down through the layers and away.  However, for an indoor wash bay, there are more options.  While mats and concrete are the two most often used, both have their down sides.  Concrete is hard on a horse’s legs and can become slippery when wet.  Scoring the concrete with grooves will make it less slippery and direct the water more easily to the drain.  Stall mats in wash bays should be removed periodically and both the mats and the floor underneath be allowed to dry after cleaning with a disinfectant to eliminate mold or mildew and remove any mud or manure that may have collected there. Another option is to use rubber pavers in the wash bay

When putting in the flooring, make sure that the bay slopes to help keep your horse from standing in water.  A general rule of thumb is one inch of slope for every six feet of stall.  There are several places to install your drain.  One of the most common is right in the middle of the wash bay.  But some horses can be spooky and not want to step on that “thing” in the middle of the floor.  Be sure you add a removable trap for cleaning.  Another option is to put the drains near the back of the bay and use a removable grate.

Lights and radiant-heaters are great additions to your wash bay.  Infrared heaters can be wash bay heateradded to help take the chill off a wet horse in cool conditions. While heaters work best when installed directly over where the horse will be standing, lights should be installed on either side of the stall ceiling or on the side walls to prevent shadows that could spook a horse. Add shelves or cabinets for common grooming supplies like brushes and shampoo and/or medical supplies.  Look for cabinets made of plastic or metal – wood or laminate can fall apart too easily.

Hoses are a necessary part of any bath, but are often the most aggravating part of the process.  Some people coil them up after use; others leave them strewn around so your horse has to step over them to get into the bay.  The best solution is an “over-the-top washer.”  The wash unit keeps the hose above the animal’s head and off the floor, making it easy to move quietly and quickly through the bathing process.

Check out our web site for more wash bay ideas and accessories.

Photo credit:  Classic Equine Equipment